Devlog #2


Devlog #2 The Cube
The Process
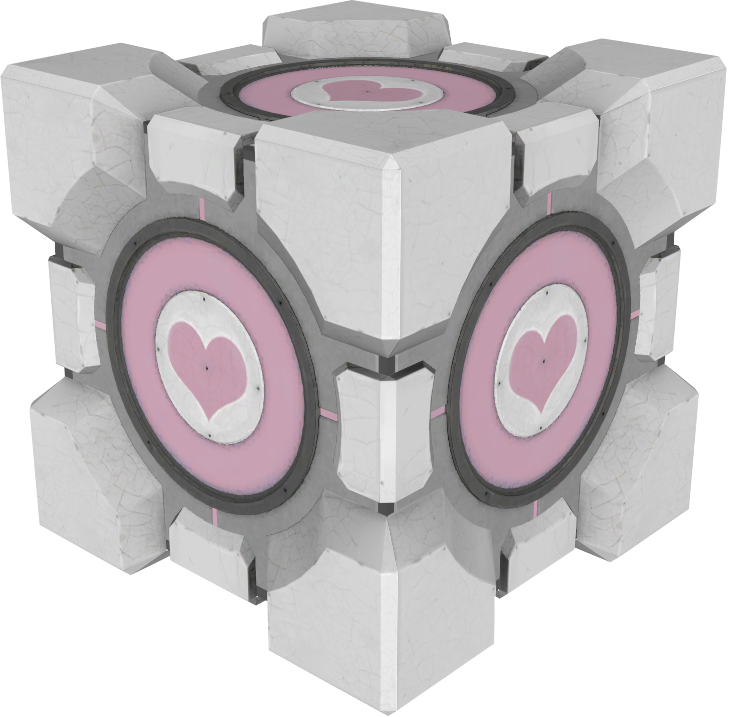
This week I focused on creating the first model for my Portal 2 themed diorama. I had a choice of doing either the regular, blue portal cube, or the pink companion cube. While the regular cube is more popular, the companion cube is fan favourite due to the in-game story. The design is also more eye-catching so I went with pink + heart shape, over the regular one.

I used and image of the original as reference, as is going to be with all of the models for this project, and additionally I tried to find the original models on Sketchfab to get an idea of the dimensions and scale of things in a 3D perspective. I also gathered reference through in-game screenshots, and even opened the game myself to check how it looks from all angles.
I checked the measurements and the companion cube is meant to be around 1 meter in height, length, and depth. I used the grid in blender to guide me an I started bringing in my references to create the model.
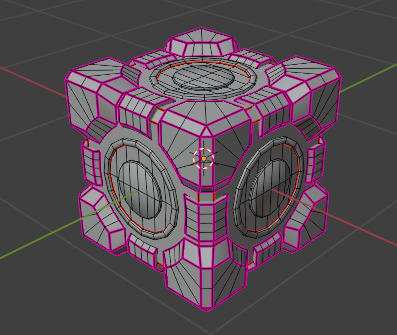
I like to use the trick of making separate objects for each complex part of the model. This is because it helps me to keep a low polygon count during the process. For example, on the inside there's a simple cube with it's edges bevelled. Instead of adding complex geometry to it in the form of corners, I opted for making the corners a separate object, that way the geometry of the cube would be left untouched. I did this by picking 1 corner only, creating the corner piece, and using a mirror modifier that will mirror the object across the cube on all sides, saving a ton of time. I did this same exact mirroring process for the rest of the pieces for the cube. This helped me to break down key elements, instead of tackling the whole model at once.
For me, this was the simplest and most intuitive way of going about creating this model. I was able to effectively break it down into smaller elements that I could focus on, rather than try to piece the whole thing together at once.
During the process I used techniques such as subdivision surface modelling, for some of the smooth details on the corner pieces. I realise this method can add a ton of unnecessary loop cuts though, and therefore I used it sparingly, and went back after applying this modifier to delete the useless geometry. Afterwards, I shaded everything smooth and carefully selected individual lines that I want to be shaded as sharp. I recently learned this technique, instead of blindly pressing auto-smooth, as this manual way of doing it really helps me to define how I want my model to look. The final model has 2,548 triangles.
With the model all shaped just right, my mind was already on texturing, but before I could jump into that fun process, I had to unwrap my model. This is where I realised my mistake. I needed to unwrap each individual corner, and each repeating element over and over. I really didn't want to spend all this time repeating the same process again, so I deleted all the mirrored elements, leaving only the originals. After I unwrapped those elements, I was then able to mirror them and they retained the marked seams from the original elements, saving me time that I can use to focus on texturing.
As stated in my first Devlog, I wanted to approach this with a game developer mindset, and so I needed to pack all the UVs into one space to save on memory. This is also useful as it will save storage on my drive, with less textures needed. This additional challenge proved a little annoying at first. I needed to unpack each element individually, average the texel size of the UVs, and pack them together into 1 space, but I got the hang of it in the end.
I didn't stack any of the UV on top of each other because it could have unintentionally created repeating patterns on my final textured model.

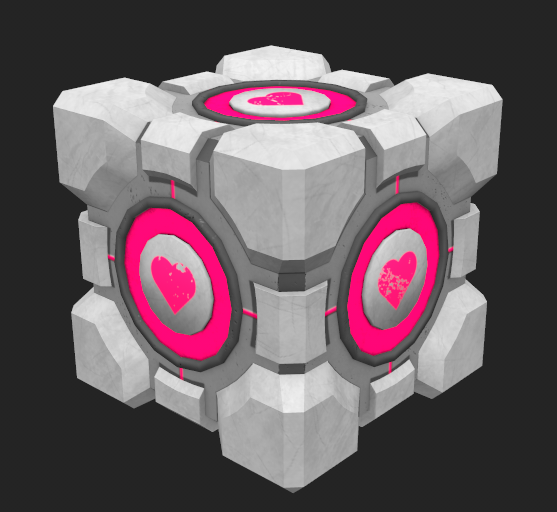
Now for the fun part which is texturing. I was a bit weary of using Substance Painter for the first time. I wasn't sure if I'm going to be able to recreate the look that I wanted. I honestly think that I left a lot of room for improvement with the final look that I created, and I want to push myself more for the next model that I'll make the week following.
After Importing my model into Substance Painter, I baked all the maps that I needed to properly apply the textures and have additional detail. These are the maps which I use, and I bake them at a 8192x8192 resolution. You might think this resolution is insane overkill, but all it does is make the maps highly detailed, and take a bit of extra time while baking. The actual export resolution is set elsewhere, and I chose to export it at 1024x1024. I don't need any more than that in for this model, because it is going to be viewed from a distance in an isometric view, making it a higher resolution redundant.
For the texturing itself, I like to work my way up with adding detail, starting with the base colours and improving the look from that foundation. I even often go back and reduce the detail from previous layers to balance out the new effects added. I added detail such as dirt and smear patterns onto what appears to be the hard plastic corners. Additionally, there's slight scratches and minor details added to the cube, such as the lines on each face. Finally I added the heart icons and layered a grunge mask on top of them to make them appear worn down. Some final touches and a pink glow to the lines was added, after I double checked the reference and realised that they were meant to glow.
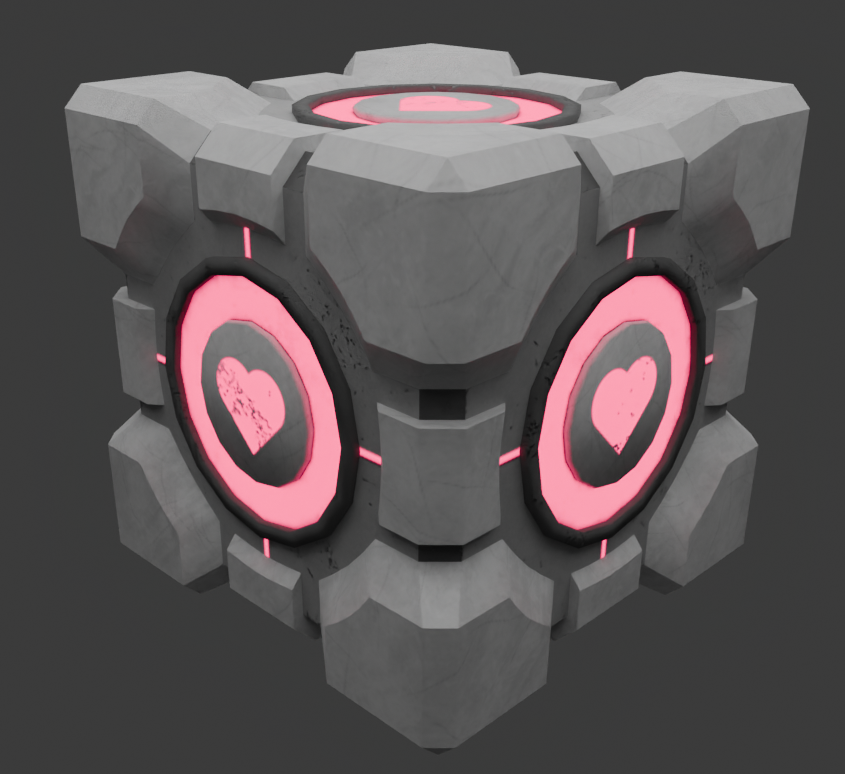
I was very happy with the final result overall, and excited to export my textures and take them into blender, with the export setting set as Blender Principled BSDF.
Here's the final result of the model in Blender, rendered in Cycles, with the textures setup in through Blender's shading nodes.
The Evaluation
Looking back, there are definitely a few things I could have done differently. While using the mirroring modifier was a huge time-saver, not unwrapping the original pieces before mirroring made me do extra work later on. I ended up having to delete the mirrored elements, unwrap them properly, and then mirror again to save time in texturing. This mistake slowed me down more than it should have. Also, when it came to texturing, I played it a bit safe, because it was my first major run with Substance Painter. The details like dirt and scratches are there, but I feel like I left a lot of room for improvement. For instance, the heart symbols could have had more wear and tear or even some colour variation to really give them character.
The Reflection
Overall, I’m pretty pleased with how the model turned out. Even with a few bumps here and there, the model captures the iconic feel of Portal 2, and I’m super happy with the clean topology and solid structure I achieved using the mirror and subdivision techniques. Diving into Substance Painter was an exciting challenge. Watching the model come to life with layers of texture, grime, and that subtle pink glow was quite fun. This project has boosted my confidence in handling both the modelling and texturing aspects, moving forward I'm excited to take these lessons on. In the future, I plan to learn from my UV unwrapping mistakes and push the texturing work even further.
Next week I plan on creating the floor button, see you then!
Leave a comment
Log in with itch.io to leave a comment.