Devlog #7

Devlog #7 Pulling Everything Together
The Process
Finally, after all those weeks of hard work, I have to put in more hard work to see the results!
All jokes aside, I was really excited this week to finally put my models together in a nice scene. I don't think it's quite there yet, but I'm so close to getting a final look that I want.
I started this week by looking into how to setup my camera in Blender. I found this cool addon called Create IsoCam that creates and fills out all the settings for you which is great. https://github.com/jasonicarter/create-isocam
With a few clicks I had the camera positioned where I wanted it, and through learning from the Polygon Runway tutorials https://www.youtube.com/@polygonrunway, I had a general idea of how to start the diorama. I added some basic planes as walls and a floor and imported all my models to see for scale and how the look together, and added some basic lighting.
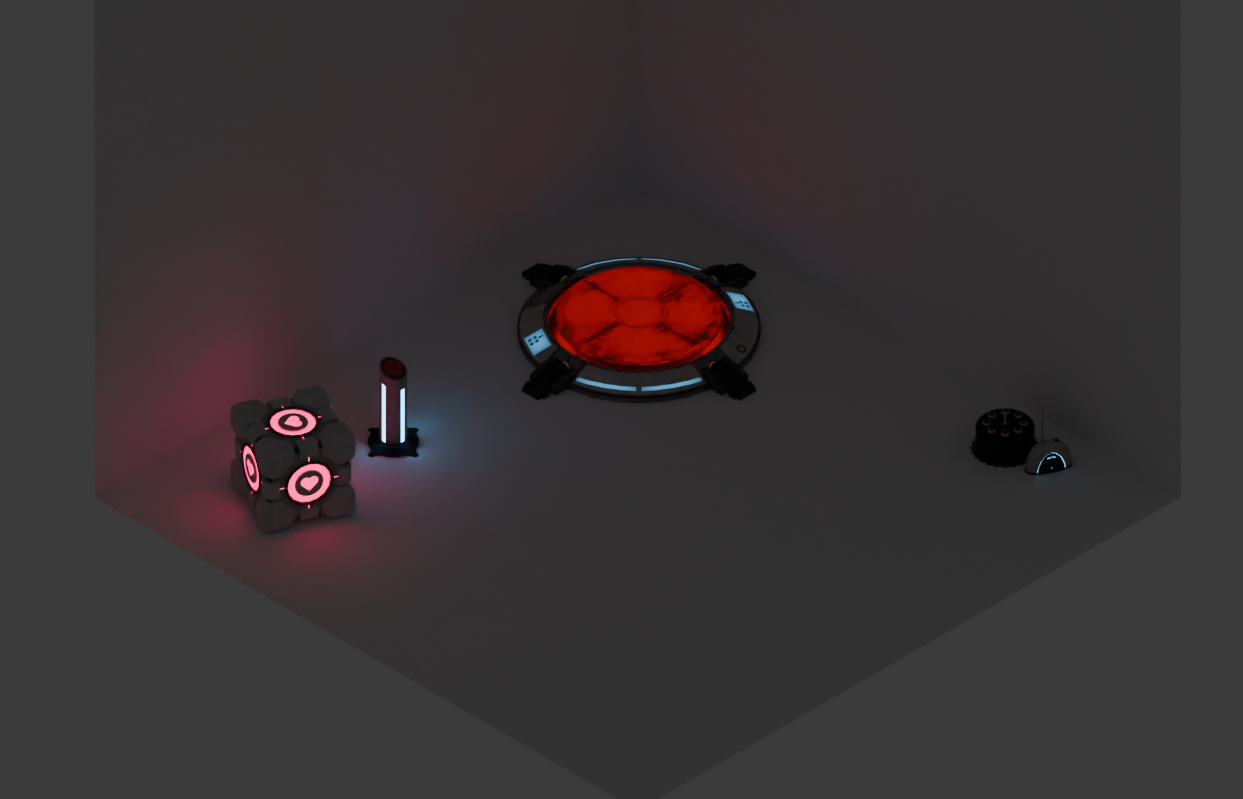
I was really glad to see that the models all look cohesive and fitting in relation to each other, even the cake looks like it belongs which I was weary that it wouldn't.

Next I was thinking about how I would want my diorama to look like, I started arranging the objects in different places, and realised that my room was too small to fit them in a nice manner. I could have scaled the room up, but I wanted to work with snap grid and scaling the room could potentially meant that my grid would be off by a bit. Instead I created Empty objects, named them, and parented each model to one of them. This way It was much easier to position each model, and I could scale the whole thing without having to select each individual element.
During this process I was playing around with the lights as I wanted to check the emission strengths on each model, so that is why they are a little dimmer than before.

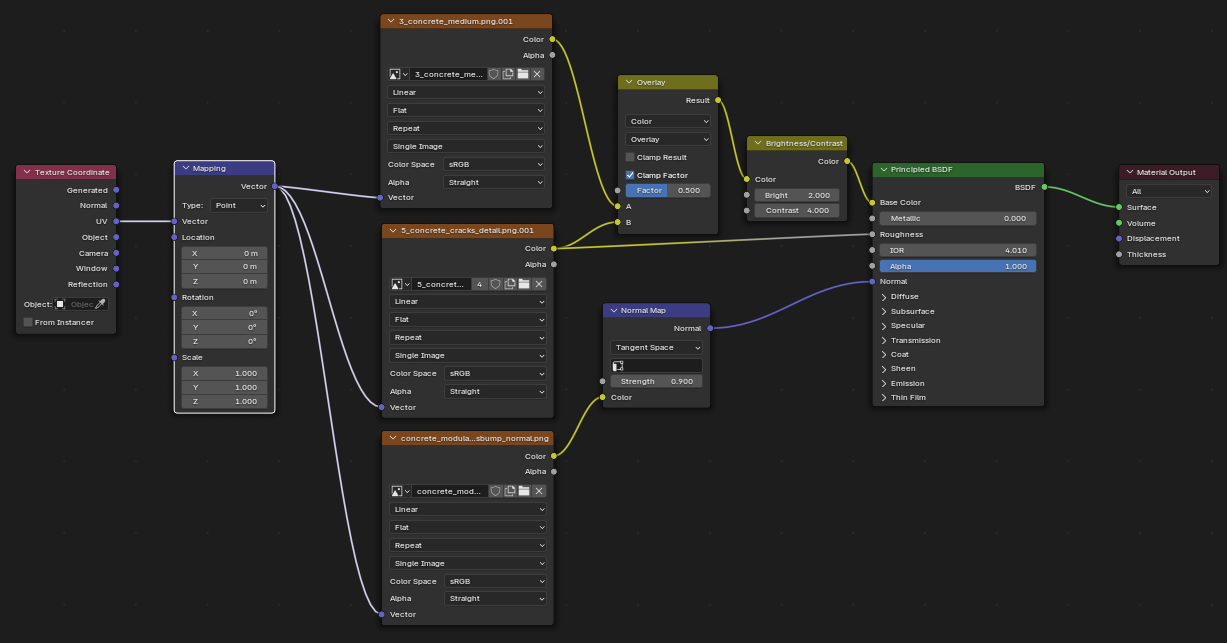
Eventually I came to a conclusion that maybe disregarding planning during my first weeks on the project wasn't the brightest idea, but on the other hand I now had a free hand in creating whatever I wanted. I decided to change my focus and create a room. In Portal 2, the rooms are made from big tiled panels, which are either white or black. I didn't think it was necessary to remake the textures for these as they are pretty specific, and that goes a bit beyond the scope on my project. I found the original textures online, in a HD version that someone remade for people to use for free. These textures were intended to be used for replacing the textures in-game, and so they used Valve's source shading system.
It is not so different from what I would do in blender, however the normal maps were done completely differently. After extracting them from mod using a program called VTF edit https://developer.valvesoftware.com/wiki/VTFEdit, I tried just plugging them in into Blender's shader graph. The base colour map was fine although a little dark, the normal maps had the correct information transferred, but in an incorrect way, due to them being valve $bump maps and not modern normal maps, and there was an additional texture used as a $detail map. I had to spend time researching how all of these different maps work in order to find a way to piece them together in blender. Base colour was easy enough, I only needed to plug an additional brightness and contrast node, to decrease the darkness of it.
As for the other two, the $detail map was something between an overlay/multiply mask layered over the base colour that would add more visible detail the closer you get to the model, in-game. Clearly, I didn't need this texture LOD feature so I just layered the texture over the base colour and it work seamlessly.
The $bump map was a little more tough because after reading a lot about it and how I could use it in blender, I found out that it's engine specific to the source engine. Fortunately, I found someone online who has made a small program that converts source bump maps into normal maps, this was a real life saver https://github.com/rob5300/ssbumpToNormal-Win.
After that all figured out, I had the textures needed for my tiles, as well as the materials setup in Blender.
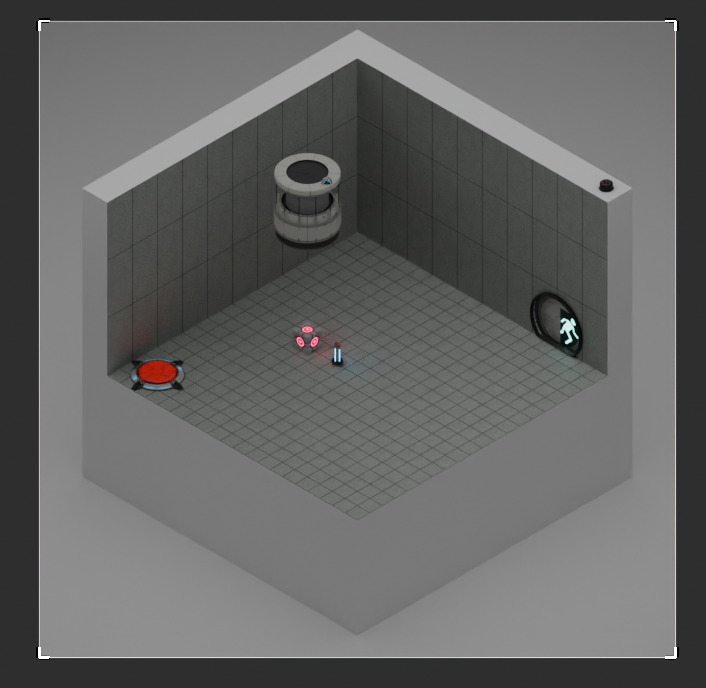
The tiles were simple extruded planes, for some extra depth, that I placed and used the array modifier on to position them on my scene. I quickly realised after placing those tiles, that my room was indeed too small for all of this. On the grid, I stretched the room out more, and zoomed the camera out to get a wider view of the whole scene. After putting the tiles in place, and extruding the walls a bit, I had something that had some potential. However, I thought about how the scene looks a little empty with only these 5 models present. I wanted some more Portal atmosphere, so I downloaded free-to-use portal assets for a door, and a cube dropper. The scene still lacks a lot so far, but after figuring all these texture things out, I didn't have much time for more experimentation.

While there's still a lot needed to do to make it more lively, I'm happy with the progress this week and I'm probably going to get some outside feedback on this, to get some fresh perspective on what might look good for this diorama.
The Evaluation
The process of arranging all the models in the scene went pretty well, especially with using empty objects to parent and easily reposition the assets. Still, I ran into some issues with planning the room's scale early on, and the grid adjustments became a bit of a hassle later. Figuring out how to work with the Valve textures was also challenging. I had to spend extra time researching how to convert the bump maps and integrate the detail maps into Blender's shader graph. Even though I managed to piece everything together, the texture workflow was more complicated than I expected, and there are definitely a few areas that need some fine-tuning, but in the end it worked well. The biggest problem was not planning the room's layout beforehand, although it will all work out in the end.
The Reflection
Overall, I'm really happy with the progress this week. It felt great to see all the hard work from the previous models finally coming together in a cohesive scene. Experimenting with the room layout boosted my confidence, and it was awesome to see that even the cake fits in perfectly. While the scene still feels a bit empty and the texture challenges kept me busy, I'm excited to get some outside feedback and see where I can take it from here.
Next week, I'll hopefully be finishing this project, with a great diorama to show.
Leave a comment
Log in with itch.io to leave a comment.